Follow these 7 steps to view the underlying code files for an LWC on your local computer! This took me about 2 hours the first time (including troubleshooting) but it really should be much faster! Remember, if I can do it, you can do it!
I’ve written so so so so many blog posts for TDAA about forms! It’s really become quite a theme around here. There’s so much that we can do with forms using drag-and-drop tools and weird, code-adjacent hacks. With that being said, there are some forms that are so unique and complicated, that they need developers to write custom code. I was faced with one of those over the past few months. This week, finally, I got to get hands-on with the new form. The developer created it using a format in Salesforce called a Lightning Web Component. These use more modern tools than other types of Salesforce custom forms/pages that you might have heard of, like Visualforce pages or Aura components. However, this blog post isn’t about what the form does or how it was built. It was about following steps to be able to see the underlying files and make changes to the display text without inconveniencing the developer if at all possible!
First, a brief intro:
- I’m a pretty experienced technologist when it comes to the database platform Salesforce, and I have some confidence that I can try things and learn from my mistakes without getting too frustrated
- I’ve used some developer tools in the Open Source project that I contributed to in the past, and hope to contribute to in the future
- That being said, I am not a developer. I don’t really know how to write code, edit code, share code, etc. I’m getting better at reading code and determining when it is necessary to commission code.
- This was pretty low stakes for me. If I couldn’t figure it out, there wasn’t much on the line
- I enjoy learning!
Other types of code that I’ve seen in Salesforce are relatively “find-able” either by searching in Apex Classes in the Setup Menu, or using the Dev Console, or Workbench, to find the code files. I learned the hard way that the underlying code for Lightning Web Components are not viewable in a browser. I think this is better for developers (?) but it’s a LOT worse for people like me! UGH!!!
Step 1: Github
I had a general idea that I needed to create a code repository (they are usually just called “repos”) to act as a storage unit for the code I want to see (before I can even download it, see it, or interact with it in any way). I have used Github before, but I always find it pretty intimidating after a long time away. It’s basically the opposite of “riding a bike” (lol). For those of us new to it, Github is basically a super fancy way of doing “track changes” to code files.
So, I logged into [the account I already had] at Github.com and made a private repo (since I know there are not any other collaborators on this project). Once this was created, I opened the repo in Github Desktop (a separate app that I already had, but in this case, needed updates).

There might be a more efficient way to do this (feel free to leave me a comment!) but at least this is the way that I know how to do.
Step 2: VS Code
Next, I wanted to see my Repo in another program, Visual Studio Code.
Using the “track changes” metaphor, Github is where you see/approve changes and VS Code is where you type in the files.

Below: this is what an empty Repo looks like in VS Code (yours will not have the “Manifest” folder or “prettier” files because I set those up separately).

Step 3: Install sfdx CLI
VS Code is a developer application that people use for many types of code writing. We need to download extensions that make it more useful for interacting with code for Salesforce.
I already had these, but they needed updates.
Step 4: Create manifest
[these are instructions for a Mac] In VS Code, type the following key combinations to open the Command Palette:
COMMAND + SHIFT + PNext, search for the option, “SFDX: Create Project with Manifest.” Select “Standard” and then give the Project a name.
(VERY SPARSE documentation of Manifest here). My understanding is, this basically creates a shell file that will be filled in later.
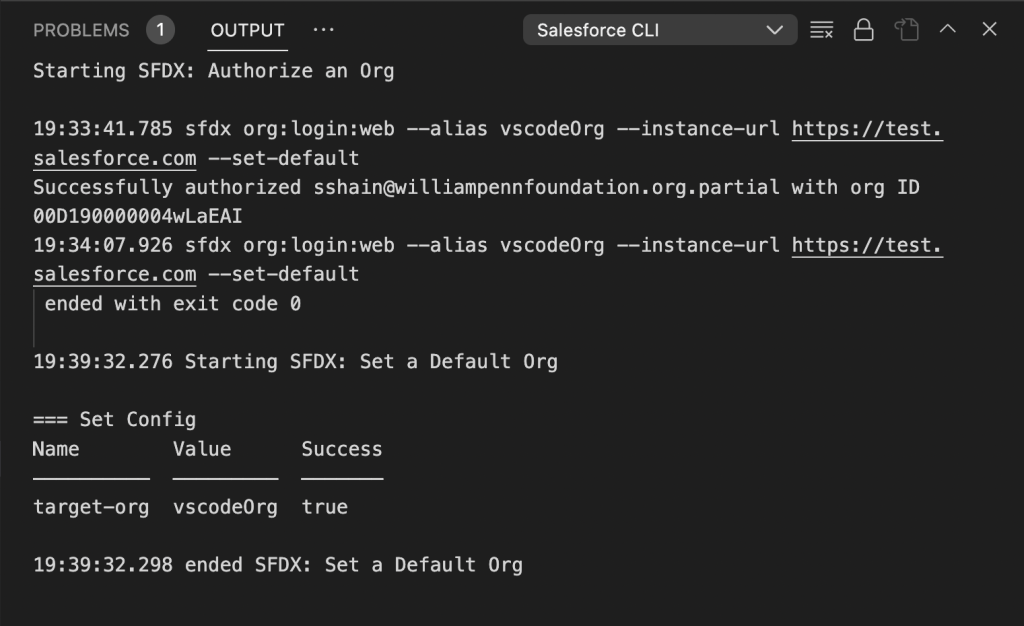
Step 5: Authenticate into org
In order to fill in the shell file (that you created above) with data, you need to connect to your Salesforce org.
[these are instructions for a Mac] In VS Code, type the following key combinations to open. the Command Palette:
COMMAND + SHIFT + PSearch/select SFDX:Authorize an Org > Sandbox (in this case) > login through browser > complete authentication steps (in this case authentication app)
I got two “success” messages – one in the Browser and one in VS Code.


VS Code, since it is designed for developers, expects us to have more than one org available. Therefore, we have to set an org as the default before we can do the next step. You can do this by opening the Command Palette and selecting SFDX: Select a Default Org and then select a default org from the drop down. This is the “output” from this command.
What I’m learning is, the “Command Palette” is a shortcut to writing all of the commands in the Terminal. It takes the “Command” and puts it into code for me.
Step 6: Download metadata
Finally, the good stuff! And the easiest step of all!
Click on the folder “Manifest” to expand it. (In VS Code, folders show up as drawers with the expand/contract triangle visual cue). Then, right click/click with two fingers (trackpad) on the Package file and select “SFDX: Retrieve Source in Manifest from Org.” This will essentially download all of the metadata/code files onto your computer, in the file structure specified for you in the repo.

Step 7: Look in Force-app drawer
The last command took a long time to run. Like, a LOT longer than I expected. I actually gave up and walked away because I thought it had timed out. But when I came back, I saw that it had succeeded!
I scrolled up and opened the Force-app folder/drawer, scrolled down to LWC, and found a folder for each lwc in my org, including the new one that I was dying to see!
The lwc “bundle” is comprised of several different code files that play different roles in determining how the lwc functions. When I opened the files, I could tell which ones had formatting/design elements, which ones had automation, and which ones had text that displayed on the screen. I really enjoyed reading these files and connecting the dots about how the lwc actually works.
wrapping up
I was able to accomplish this using a combination of:
- past knowledge/past help from friends
- past learning on Trailhead
- trial and error
- reading documentation
- consulting Salesforce developer forums
Many of these methods leave pretty large leaps unexplained (like, assuming that everyone knows what a Terminal window is). I might be guilty of being vague here where more explanation might be helpful; if so, that is not my intention! Please leave me a comment and I will do my best to explain. Also, if this blog post helps you, please leave me a comment, as well!